
AnyPortrait > Forum > How to Use
Hello, new user stuck on first tutroial…
- This topic has 4 replies, 2 voices, and was last updated 2 months, 3 weeks ago by
merky water.
-
AuthorPosts
-
July 16, 2026 at 6:20 am #1608
Unity ver: 6.3 LTS
Project settings: Default Universal 2D
Anyportrait ver: The Demo version from this site
While following this tutorial: https://rainyrizzle.github.io/en/GettingStarted/GS_1_4.html
It told me to bake to see the character appear within the engine, but it looks invisible to me
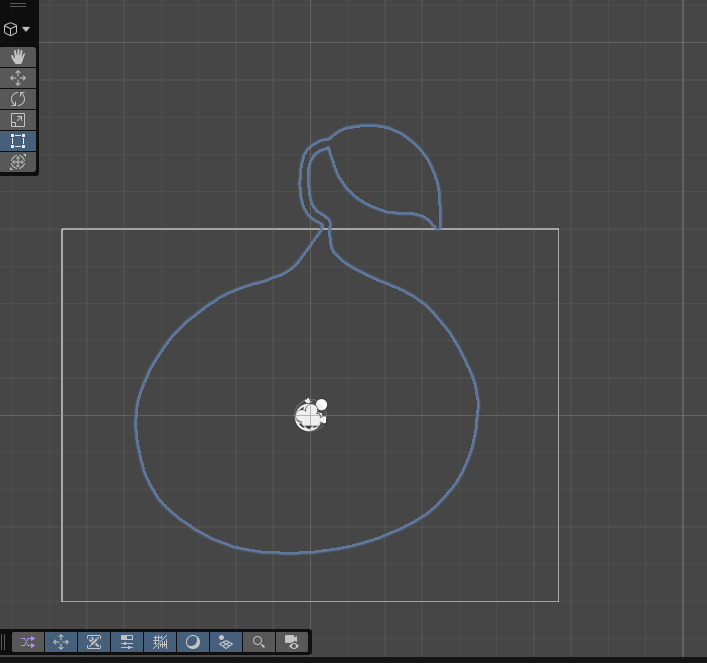
I did get an error message to set color space to Linear(since project was in Linear I guess) So I fixed it but it still appears invisible.
Changed both character texture’s color space and project settings to Gamma, also didn’t work
I went back and forth hoping it would work but no. Quick bake and other forms of refresh options don’t seem to work
Current validation checks all look good:
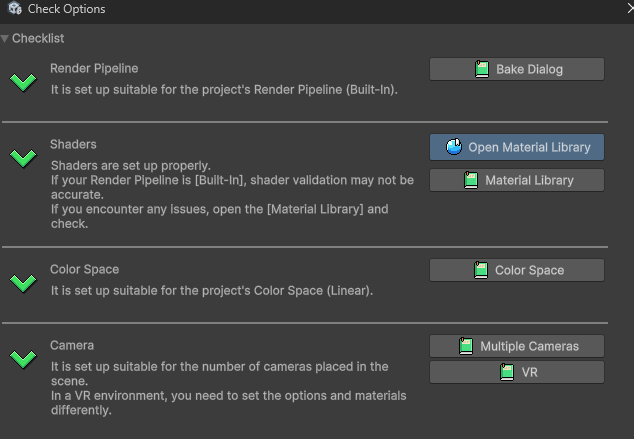
I am also confused about renderer, when I was checking the render pipeline setting, it was set to none. Maybe that is the cause? When I clicked on it, I had option to choose URP, but pretty sure manual said to use SRP? But I am also a newbie at game engines, so I don’t know what I am doing lol. I am just assuming it’s like having mutiple renderers like in blender workbench/cycles/eevee and since my project don’t have dedicated renderer, it’s not showing me the sprite maybe? But then checklist says my render pipeline is fine…
July 16, 2026 at 11:00 am #1609okay I think I figured it out, it was more of a unity problem not anyportrait
July 16, 2026 at 11:19 am #1610 RainyRizzle
Hi!
It seems that you are having difficulty with the renderer settings as you are new to Unity and AnyPortrait.
We will briefly explain how to resolve the issue you are experiencing below.Before proceeding with the explanation, let us briefly explain renderers in Unity.
In Unity, there are the following renderers for rendering, in other words, “Render Pipelines.”– Built-In Render Pipeline: A renderer that has existed since earlier versions of Unity. Since it is built-in, users cannot modify it. (It is the only method that is not an SRP.)
– Universal Render Pipeline (URP): One of the Scriptable Render Pipelines (SRP) primarily used in the latest versions of Unity.
– Lightweight Render Pipeline (LWRP): An earlier version of URP, currently not in use.
– High Definition Render Pipeline (HDRP): An SRP designed to create high-quality 3D worlds; due to its specialized operation, it is not compatible with AnyPortrait.Starting with Unity 6, the use of URP is recommended by default.
However, previously, configuring URP required installing a separate package and modifying project settings.
Users had to learn how to install and configure it to apply URP, but this process was omitted in Unity 6.
Ironically, this has become a cause of difficulties related to URP for users new to Unity 6.
In particular, assets compatible with versions prior to Unity 6, such as AnyPortrait, require separate work for the Render Pipeline, which causes inconvenience to users.Therefore, it would be helpful to refer to Unity’s documentation and videos related to URP while reading this answer.
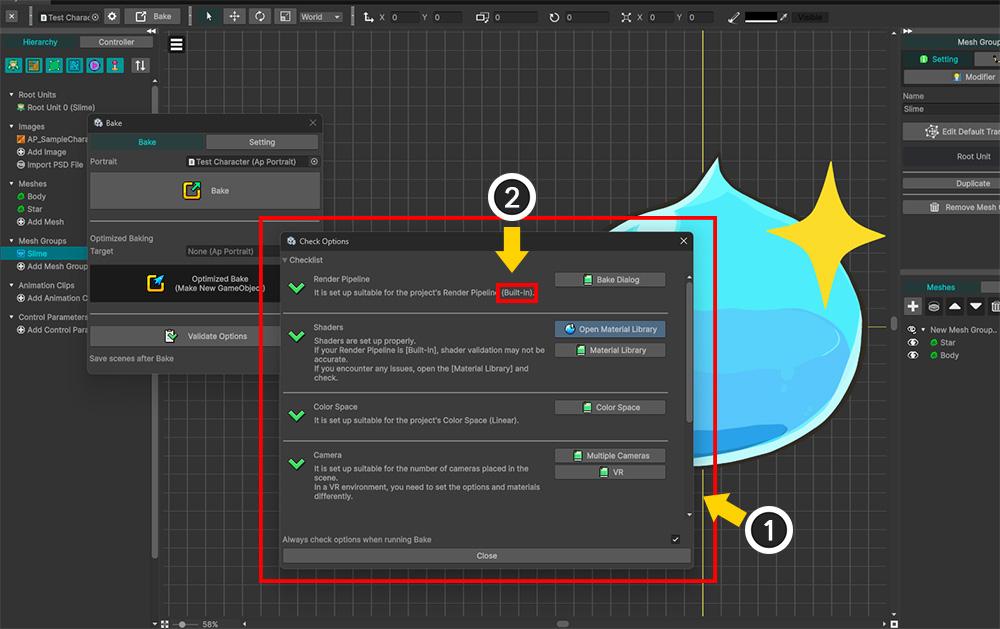
To reproduce the issue exactly as you inquired, we created a new project using the “Universal 2D” (hereinafter URP 2D) template in Unity 6.3.
We also installed the AnyPortrait demo version and created a simple character.(1) When attempting to “Bake” and using the “Validate Options” function, the screen shown above appears. It appears that all issues are resolved when you click the “Fix Now” button, likely because a problem occurred in the “Color Space.”
(2) However, if you look at the text under the “Render Pipeline” item, you can see that the current project’s settings are being recognized as “Built-In.”Since this project was created using the “URP 2D” template, it is not normal for it to be recognized as “Built-In.”
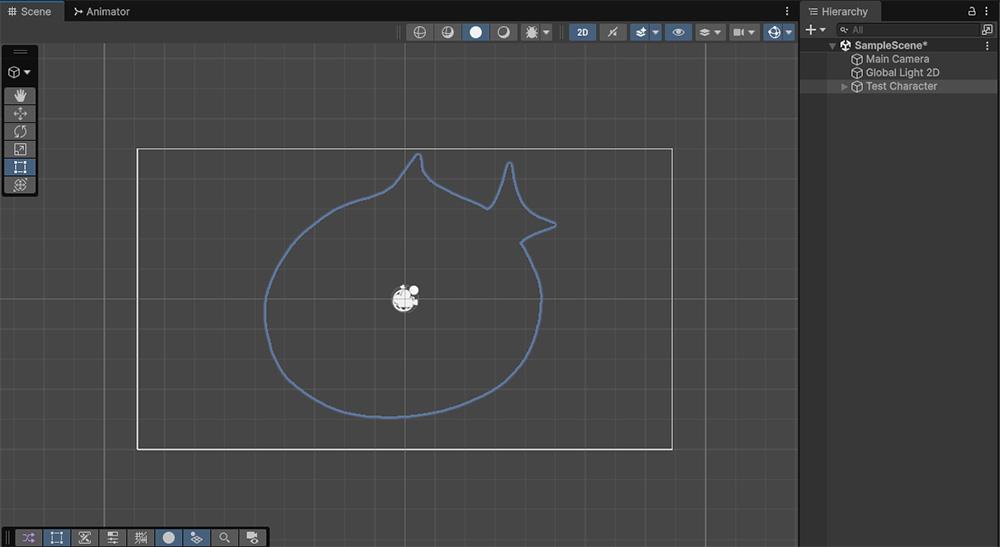
Because the Render Pipeline settings of AnyPortrait and the project do not match, the character is not rendered properly as shown above even after baking.
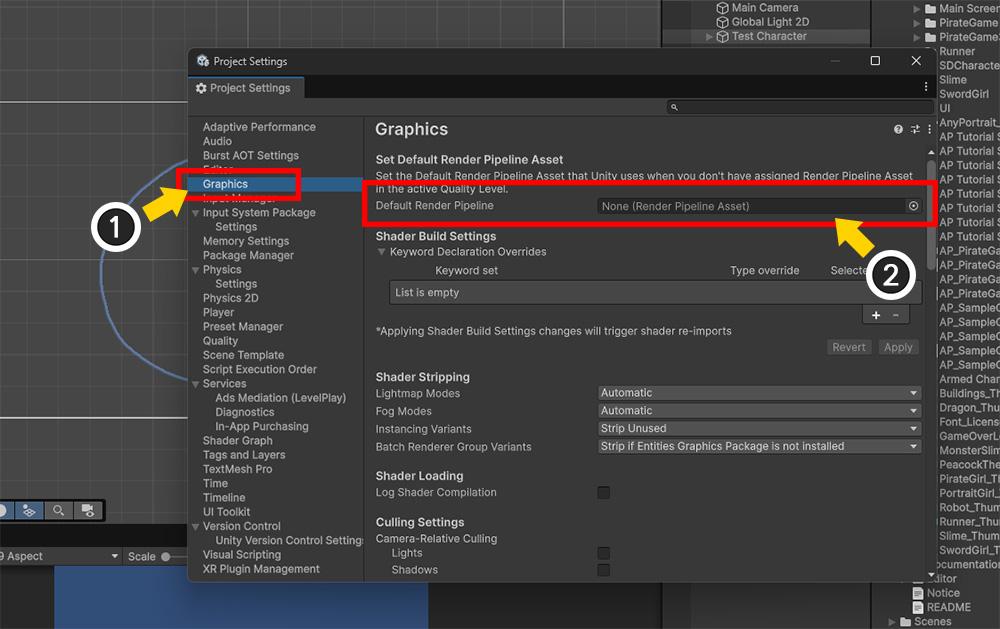
Let’s check the project settings.
(1) Open “Edit > Project Settings” from the Unity menu and select the “Graphics” tab.
(2) Check “Default Render Pipeline”.You can change the project’s rendering method by assigning a “Render Pipeline Asset” to the “Default Render Pipeline” item.
If this item is empty, the “Built-In Render Pipeline” introduced earlier will be applied.
However, it is strange that this option is empty when this project was clearly created with the “URP 2D” template.
(In fact, AnyPortrait also checks whether rendering options are valid during “Bake” based on the value of this option; since this option is currently empty, it was being recognized as “Built-In Render Pipeline”.)In that case, “URP 2D” is likely being applied through an option other than this one.
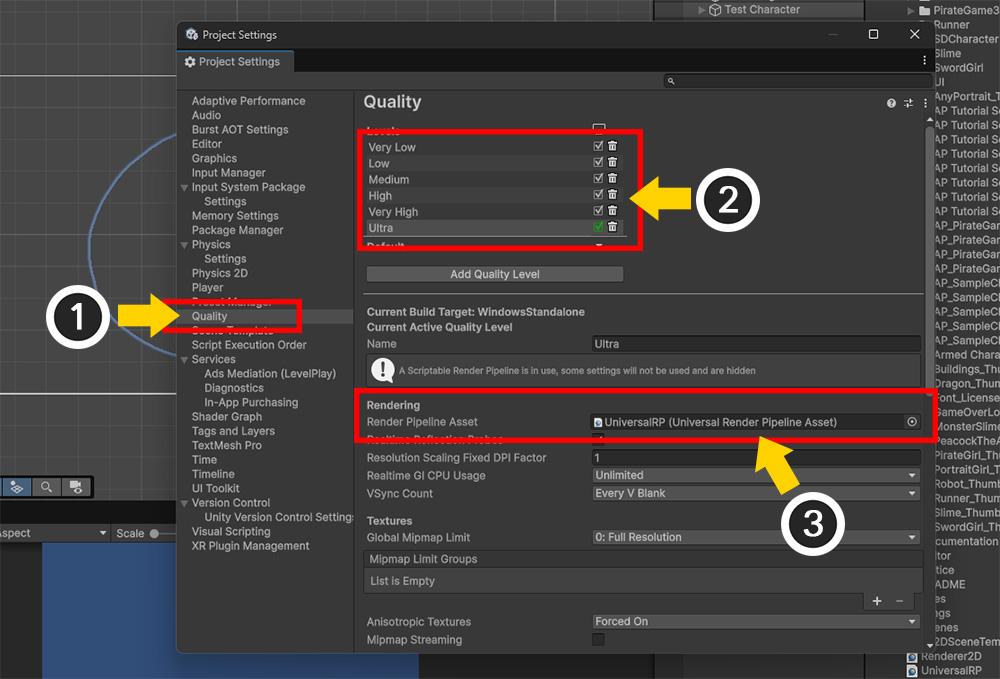
(1) Select the “Quality” tab in the Project Settings window.
(2) Select one of the “Quality Levels.”
(3) You can see that the “Universal RP” asset is being applied to the “Render Pipeline Asset” of the selected Quality Level.Starting with Unity 6, you can specify the “Render Pipeline Asset” in the “Quality” settings.
If you do not specify it in this “Quality” option, the “Default Render Pipeline” option in “Graphics” introduced earlier is used.In other words, this problem occurred because the project’s Render Pipeline settings were not applied to the “Graphics” option but were specified only in the “Quality” option; consequently, AnyPortrait could not properly recognize the project’s rendering settings.
Now, let’s solve the problem.
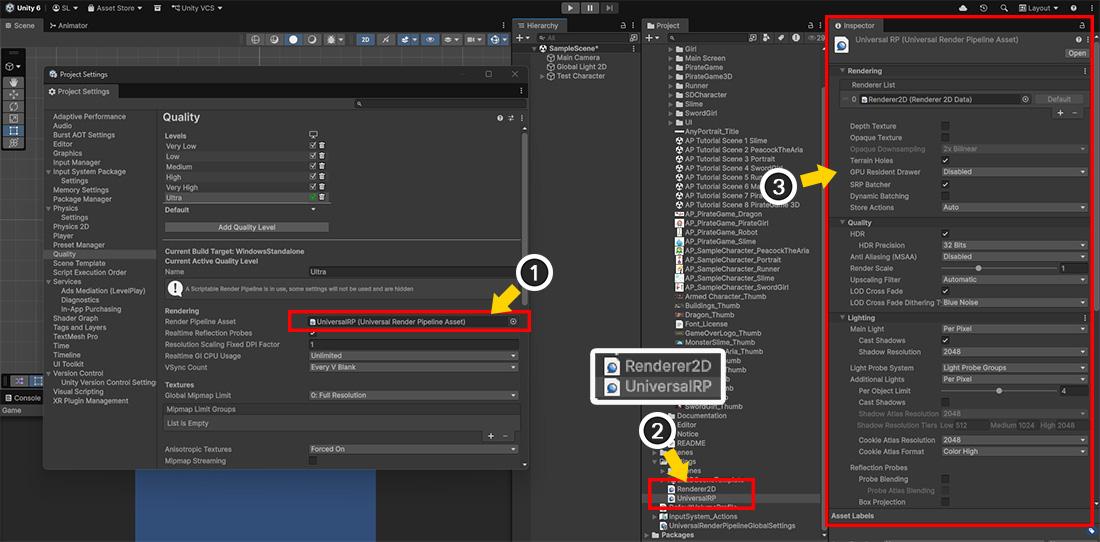
(1) Click the option on the screen above to find the “Render Pipeline Asset” currently in use.
(2) On the Project screen, you can find a URP Asset named “UniversalRP” and a URP 2D Renderer Asset named “Renderer2D”.
(3) If you select the “UniversalRP” asset, you can view the settings for the current project’s rendering method (URP 2D).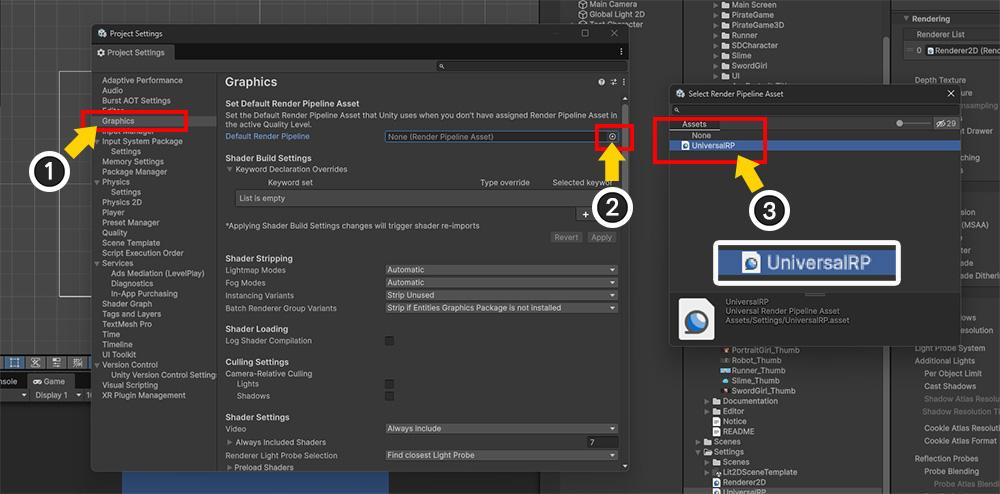
(1) Select the “Graphics” tab in “Project Settings”.
(2) Click the button on the screen above to change the value of the “Default Render Pipeline” item.
(3) Select the “UniversalRP” asset found earlier and apply it. A warning message will appear; click the “Confirm” button to complete the application.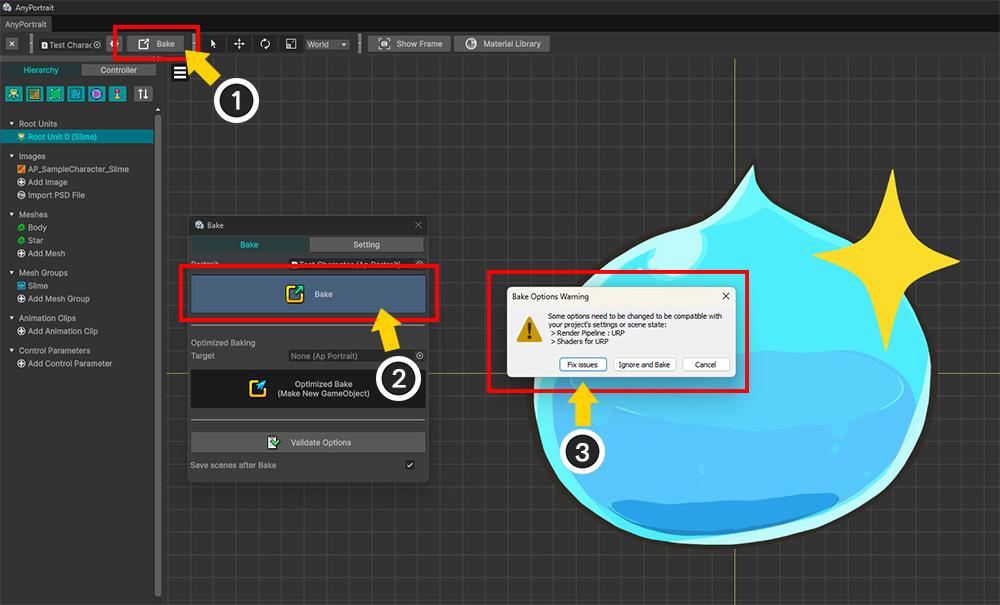
(1) Return to AnyPortrait, open the character, and open the “Bake” dialog.
(2) Press the “Bake” button.
(3) The project settings are now successfully ported to URP, and you will be informed that some settings need to be changed. Press the “Fix Issues” button.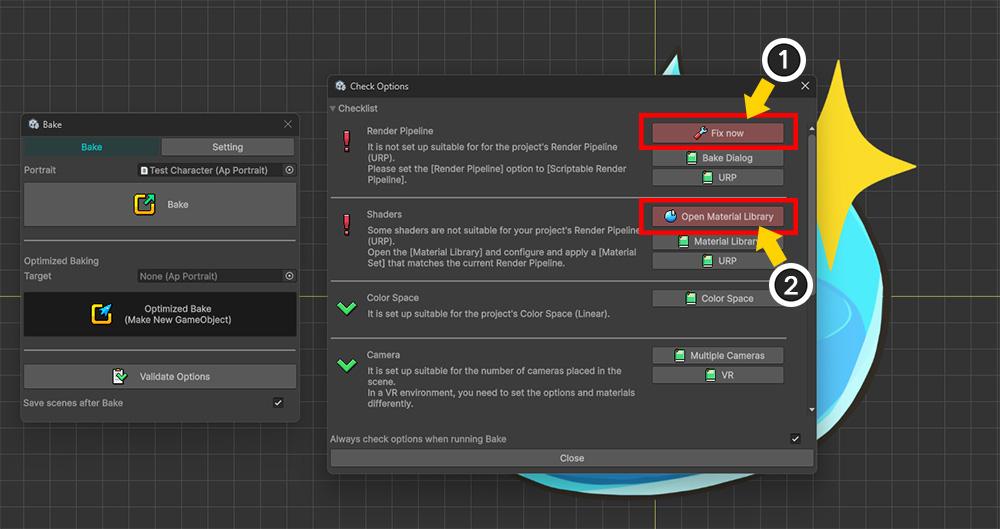
Two validity issues occurred as the project’s rendering settings were changed to URP.
(1) The issue in the “Render Pipeline” item is resolved by pressing the “Fix Now” button.
(2) The issue in the “Shaders” item is not resolved immediately.
This is because URP shaders need to be applied to the character, and the user must decide which shader to apply from among the various options.
Press the “Open Material Library” button.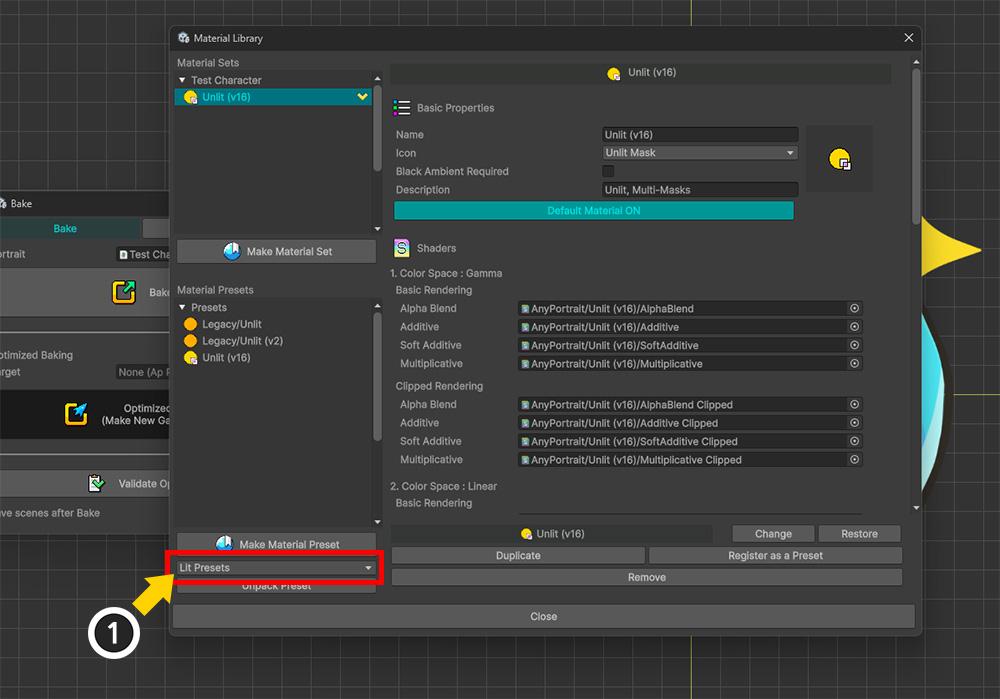
The “Material Library” window opens.
In the “Material Library,” you decide which shaders to use to configure the materials for the character during baking.
While it is possible to create and apply your own shaders, for this answer, let’s use a pre-prepared preset for URP.
(1) Click the UI labeled “Lit Presets” and change it to “URP (2023) Presets”.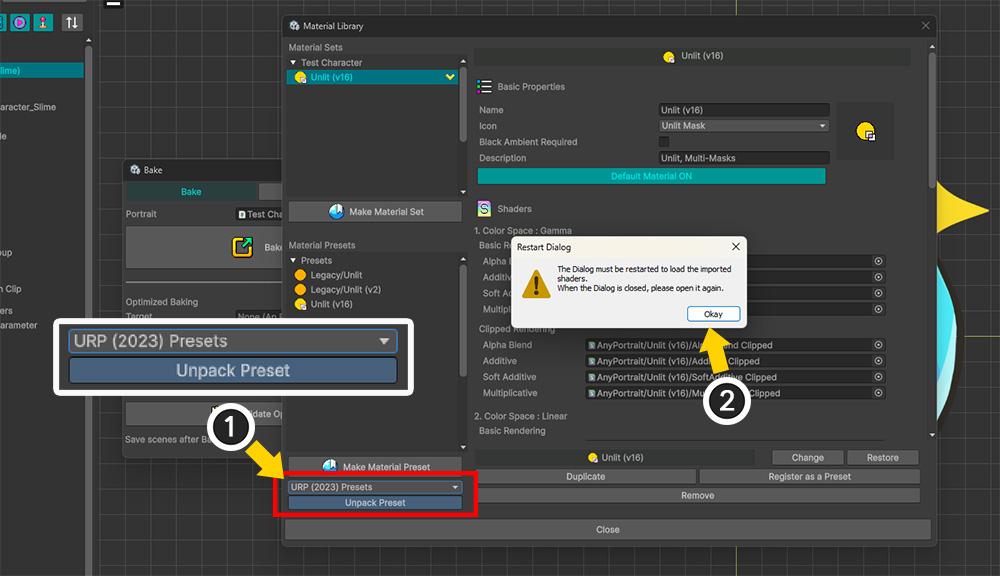
(1) “URP (2023) Presets” is a preset package that provides shaders for URP in Unity 2023 and later versions (including Unity 6). With this selected, press the “Unpack Preset” button.
(2) A warning message appears stating that you must restart the “Material Library” after the preset is installed. Press the “Okay” button.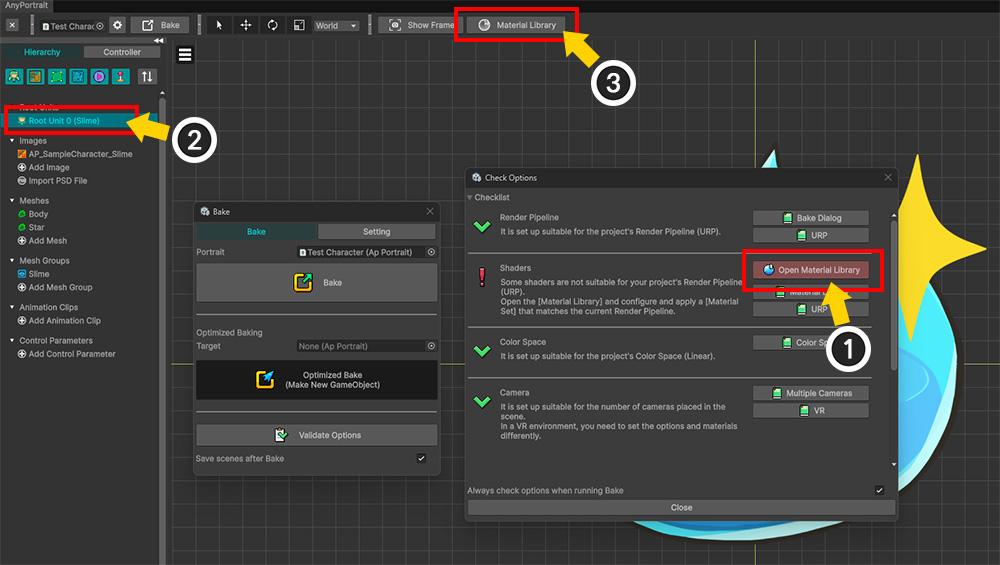
Now you need to open the “Material Library” again.
(1) If the existing validation dialog is open, press the “Open Material Library” button again.
(2) Otherwise, select one of the “Root Units”, and (3) press the “Material Library” button at the top of the screen.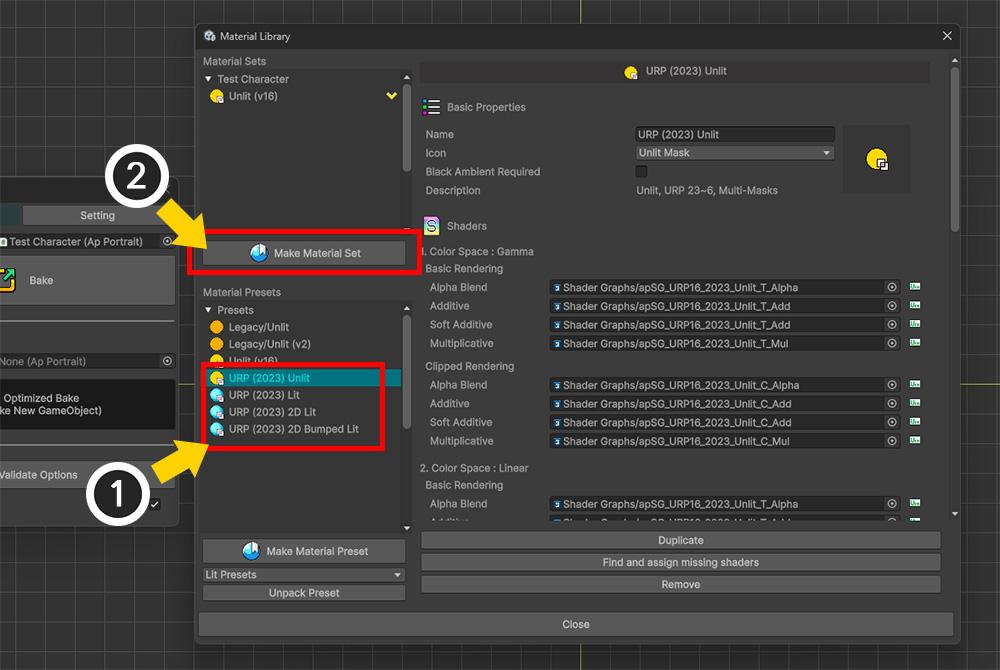
(1) You can see that presets for URP have been installed.
(2) Press the “Make Material Set” button.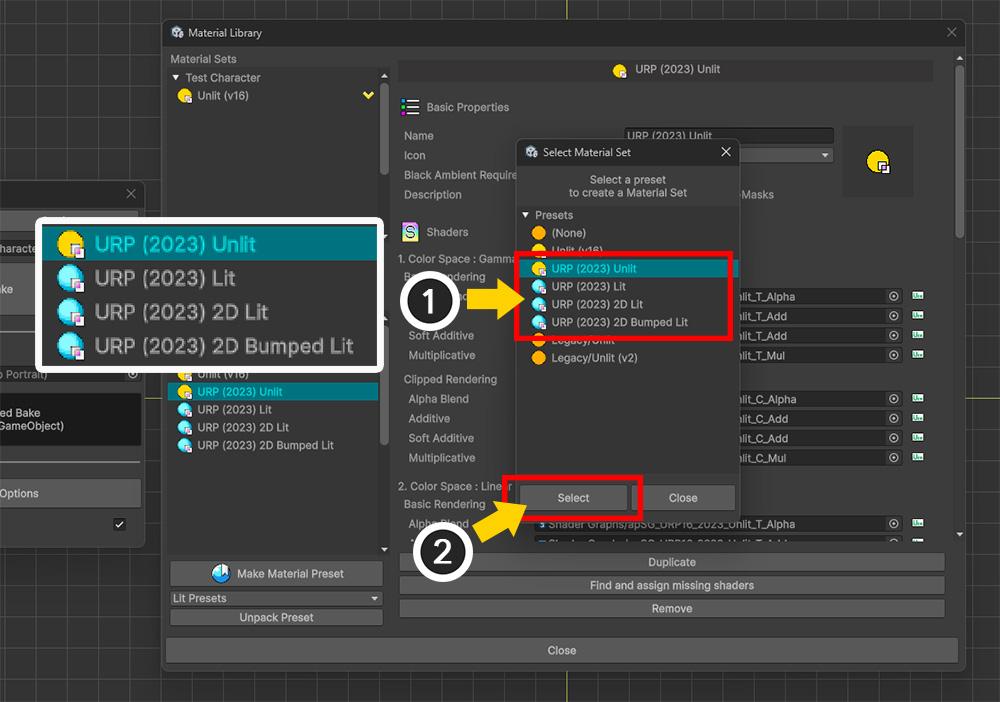
(1) You can create a “Material Set” based on a preset for URP. For URP 2D projects, you can select one of the following presets:
– URP (2023) Unlit: Available in all URPs and is a material that does not provide lighting.
– URP (2023) 2D Lit: Light 2D is applied to the character during rendering.
– URP (2023) 2D Bumped Lit: A material that applies Light 2D using a Normal Map.In this example, we selected “URP (2023) Unlit”.
(2) Press the “Select” button.
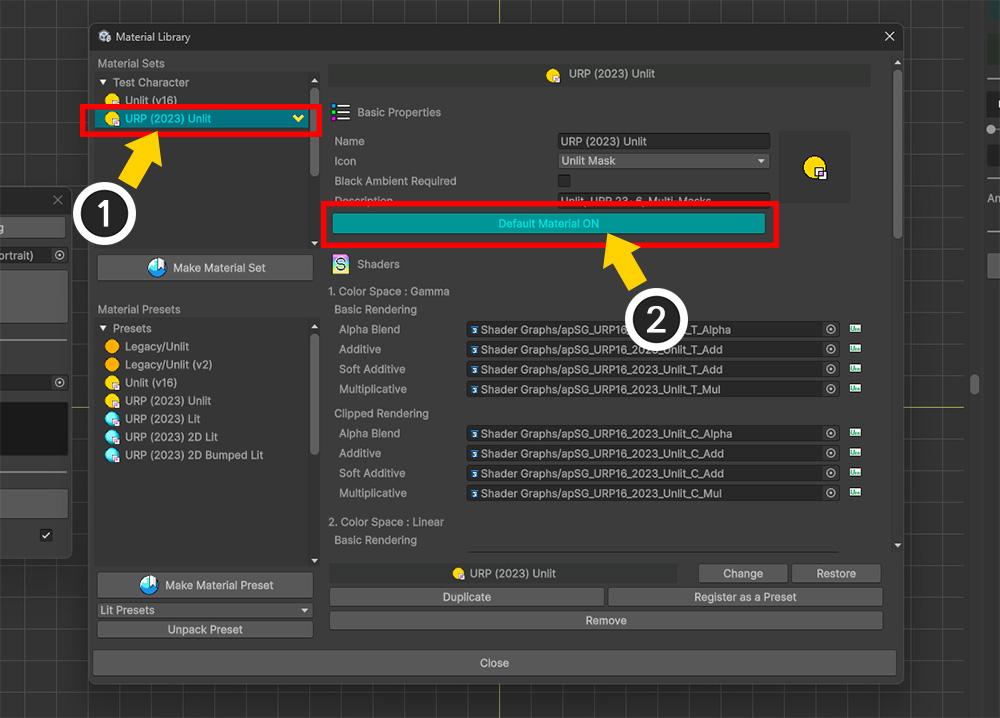
(1) Select the generated “Material Set”.
(2) Press the “Default Material” button to change it to “ON”.The URP 2D shaders will now be applied to the character.
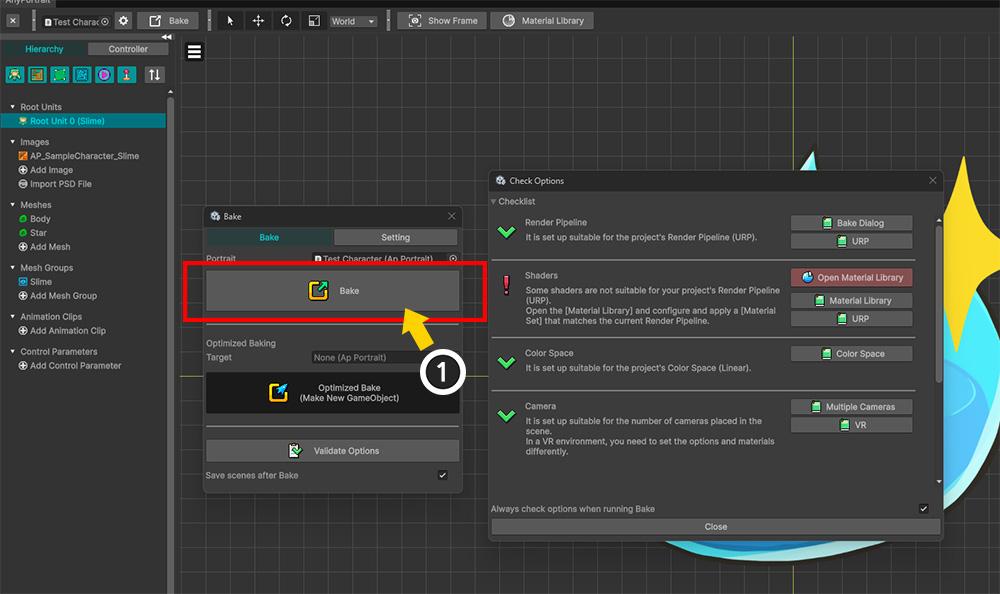
(1) Close “Material Library”, return, and run “Bake”.
(Note: In this state, it appears there is an issue as the validation does not yet recognize the changed material, but this can be ignored.)
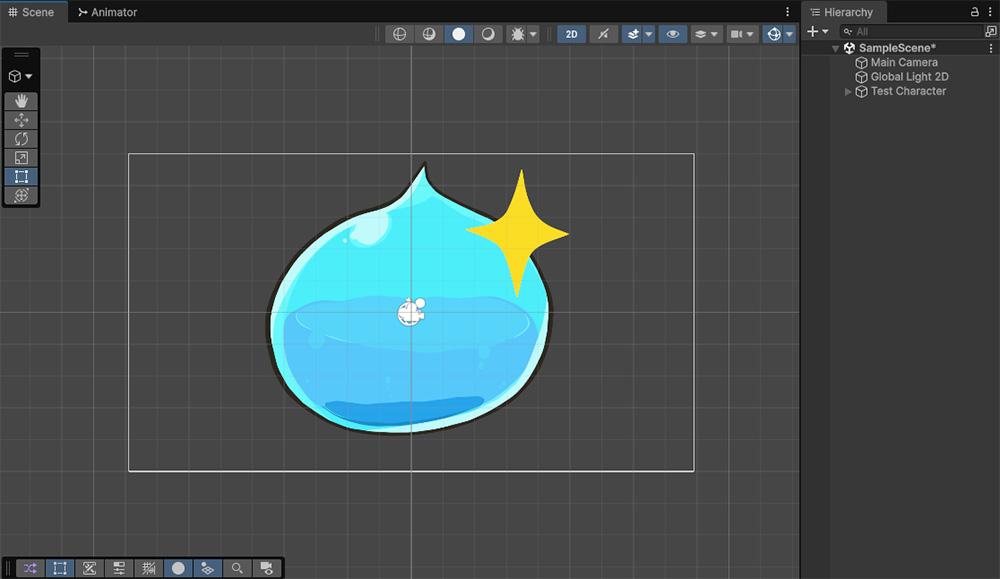
If you return to the game after “Bake,” you can now see the character rendering normally.
Setting up URP requires going through a very complex process, which will be a significant challenge for beginners.
We are continuously reviewing various measures to address this difficulty.You can find more details about the features introduced in this answer in the following manuals.
– How to set up URP: https://rainyrizzle.github.io/en/AdvancedManual/AD_URP.html
– Material Library: https://rainyrizzle.github.io/en/AdvancedManual/AD_MaterialLibrary.html
– Bake Validation: https://rainyrizzle.github.io/en/AdvancedManual/AD_BakeValidation.html————————————————————————————-
[ Additional Answer ]
If you do not intend to use URP 2D, try using the “Built-In Render Pipeline” instead.
If you leave both the “Render Pipeline” items under “Graphics” and “Quality” in Project Settings blank, the “Built-In Render Pipeline” will work.
Doing this allows AnyPortrait to render normally using only the default settings, without utilizing the “Material Library”.————————————————————————————-
If the problem persists, please leave a comment!
Thank you.P.S. It seems your issue was resolved while we were preparing our response.
We apologize for the late reply.-
This reply was modified 2 months, 3 weeks ago by
 RainyRizzle.
July 16, 2026 at 1:10 pm #1612holy, thank you for detailed post! Will read through it
July 16, 2026 at 1:16 pm #1613>We apologize for the late reply.
no no This was truly helpful, I managed to stumble upon a solution without fully understanding via trial and error, this explanation helped alot. -
This reply was modified 2 months, 3 weeks ago by
-
AuthorPosts
- You must be logged in to reply to this topic.