AnyPortrait > Forum > How to Use
[Archive] 외곽선 렌더링 / Outline rendering
- This topic has 0 replies, 1 voice, and was last updated 8 months, 2 weeks ago by
 Archive Account.
-
AuthorPosts
-
July 28, 2025 at 6:21 am #1288
 Archive Account
Q.
캐릭터에 외곽선을 출력하고 싶습니다.
Built-In 렌더 파이프라인과 URP에서의 구현 방법을 알려주세요.I want to render additional outlines to the character.
Please explain how to implement it in the Built-In Render Pipeline and URP.A.
AnyPortrait 캐릭터는 여러개의 메시들의 집합이므로, 메시의 쉐이더에 외곽선 효과를 주는 방법으로는 외곽선을 제대로 구현할 수 없습니다.
그래서 외곽선을 렌더링하기 위해서는 캐릭터 전체를 두번 렌더링하는 기법이 사용됩니다.
Built-In 렌더 파이프라인과 URP는 렌더링 방식이 서로 다르므로, 각각 다른 방식으로 구현을 해야합니다.<1> Built-In 렌더 파이프라인에서의 구현 방법
캐릭터를 임의로 더 렌더링하기 위해서는 “커맨드 버퍼”를 이용하면 됩니다.
커맨드 버퍼에서 캐릭터를 외곽선용 쉐이더로 렌더링하게 만들면, 캐릭터에 외곽선을 추가할 수 있습니다.
다음의 메뉴얼의 “외곽선이 있는 캐릭터 렌더링하기” 항목을 참고해주세요.
https://rainyrizzle.github.io/kr/AdvancedManual/AD_CommandBuffer.html다만, 이 방법은 캐릭터들이 겹친 부분에서는 외곽선이 렌더링되지 않을 수 있습니다.
위 메뉴얼에서 설명한 코드를 다음과 같이 수정해주세요.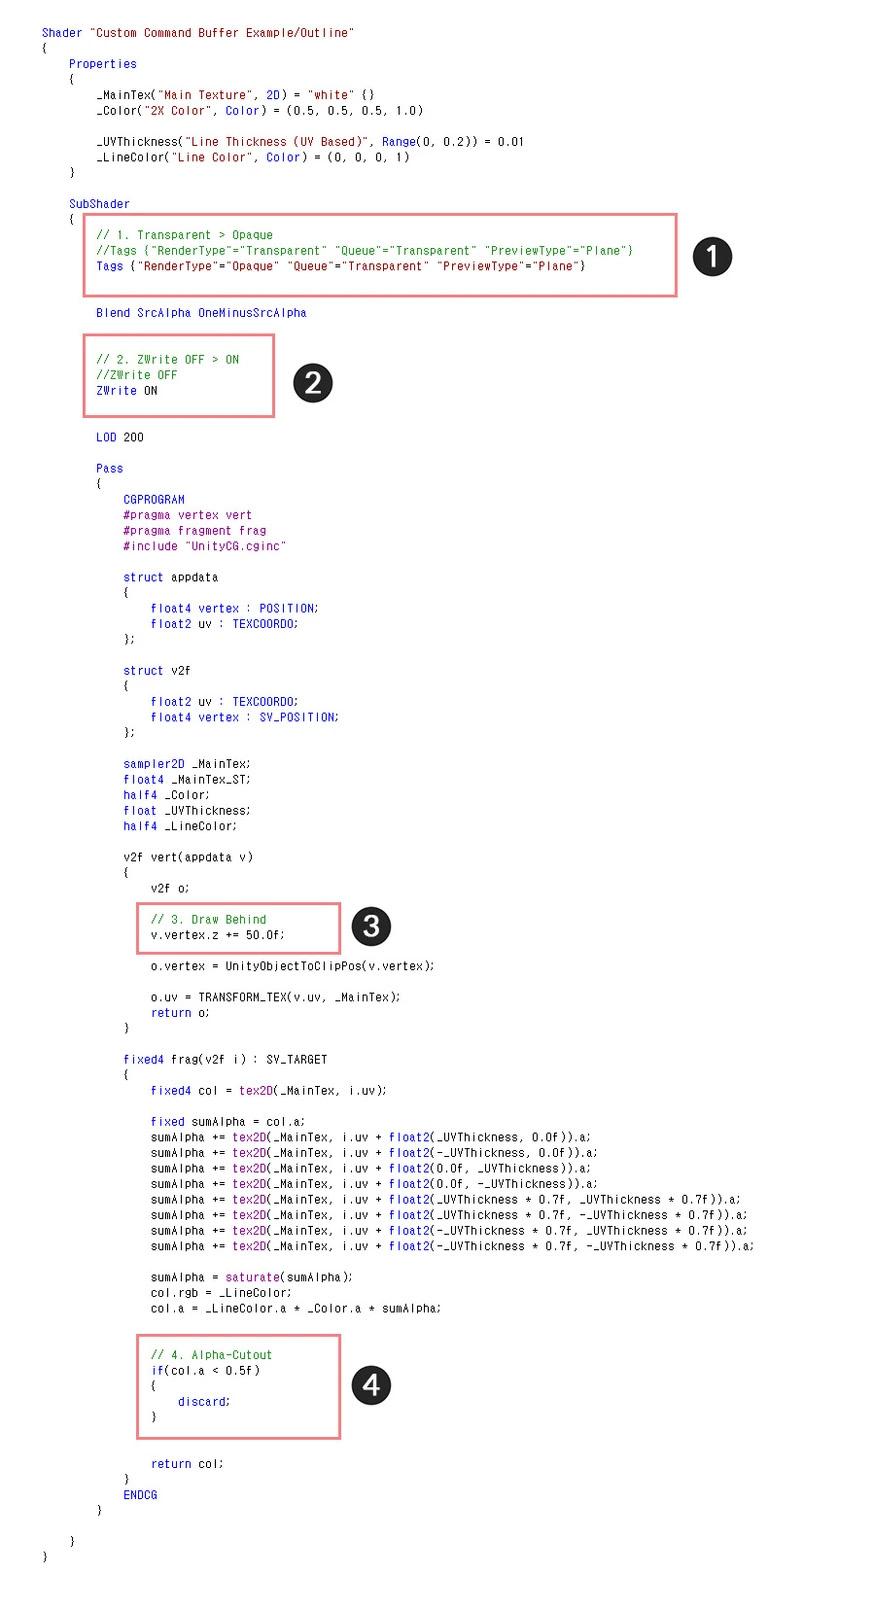
(1) 렌더링 방식을 Opaque로 변경합니다.
(2) Depth 비교를 위해 ZWrite On으로 변경합니다.
(3) 원본 캐릭터 뒤에서 렌더링되도록 버텍스의 Z 위치를 수정합니다. 값은 조절될 수 있습니다.
(4) 투명한 부분이 렌더링되지 않도록 Alpha 값을 체크하여 discard를 호출합니다.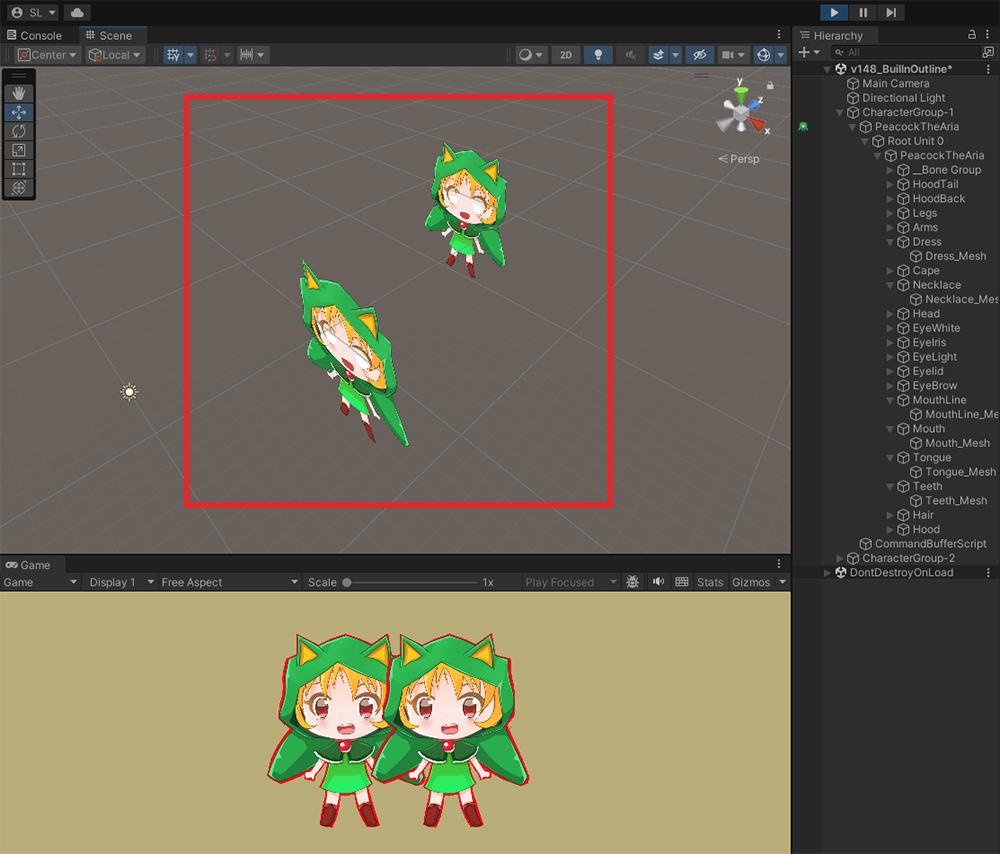
캐릭터들의 깊이에 약간 차이를 주면 위와 같이 캐릭터 간에 외곽선이 렌더링됩니다.
<2> URP에서의 구현 방법
URP는 Renderer Feature를 이용해서 외곽선을 렌더링해야합니다.
이 접근 방식은 외곽선이 그려질 영역에 스텐실 (Stencil) 값을 할당한 후, 스텐실에 값에 따라 외곽선을 일괄적으로 그립니다.구현 과정은 쉽지 않으며, 다음의 메뉴얼에서 설명하는 과정을 꼼꼼하게 읽어주세요.
https://rainyrizzle.github.io/kr/AdvancedManual/AD_URPOutlineShader.htmlAnyPortrait characters are a collection of multiple meshes, so the method of applying an outline effect to the mesh shader cannot properly implement the outline.
So, to render the outline, a technique of rendering the entire character twice is used.
Since the Built-In render pipeline and URP have different rendering methods, they must be implemented in different ways.<1> Implementation in Built-In Render Pipeline
To render characters arbitrarily, you can use the “Command Buffer”.
If you render the character with an outline shader in the command buffer, you can add outlines to the character.
Please refer to the “Rendering Characters with Outlines” section in the following manual.
https://rainyrizzle.github.io/en/AdvancedManual/AD_CommandBuffer.htmlHowever, this method may not render the outlines in areas where characters overlap.
Please modify the code described in the manual above as follows:(Please refer to the script image above)
(1) Change the rendering method to Opaque.
(2) Change to ZWrite On for depth comparison.
(3) Modify the Z position of the vertex so that it is rendered behind the original character. The value can be adjusted.
(4) Check the Alpha value and call discard so that the transparent part is not rendered.(Please refer to the image with the characters placed front and back.)
If you make a slight difference in the depth of the characters, outlines will be rendered between the characters as shown above.
<2> Implementation method in URP
URP must render the outline using the Renderer Feature.
This approach assigns a stencil value to the area where the outline is to be drawn, and then draws the outline in batches according to the stencil value.The implementation process is not easy, so please read the process described in the following manual carefully.
https://rainyrizzle.github.io/en/AdvancedManual/AD_URPOutlineShader.html -
AuthorPosts
- You must be logged in to reply to this topic.